Showing posts with label Recipes. Show all posts

Wednesday, December 24, 2014

Filipino Leche Flan Recipe

Leche Flan is the Filipino version of caramel pudding or crème caramel. It's an egg-based dessert so popular, that it's served in almost every special occasion or family gathering. Some people prefer their leche flan to not be so creamy and a bit airier. I, on the other hand, like my flan smooth, rich, and creamy.

Home-cooked Leche Flan (@thegrub78) on


Ingredients:

  • 10 egg yolks
  • 375 ml or 1 can condensed milk 
  • 375 ml milk
  • 1 tsp vanilla
  • 6 tbsps. sugar for caramel

Steps:
  1. Mix all the wet ingredients in a bowl and using whisk, stir gently. Do not beat so as to prevent bubbles from forming. Set aside.
  2. Caramelise the sugar. Usually, a llanera (steel mold that's traditionally used to make flan) is placed on medium heat to caramelise the sugar. Since I don't have one handy, I just caramelise the sugar in a pan, then transfer it into a normal steel mold. For this recipe, I used 2 round molds with a diameter measuring around 18cm.
  3. Keep an eye on the sugar making sure it doesn't get burnt. Once some of the sugar starts to melt, swirl the pan a bit to aid the rest of the sugar to caramelise faster. Do NOT stir. Once the sugar turns golden brown, it is ready. 
  4.  Transfer caramelised sugar into molds making sure that the bottoms are covered. Let cool for 5 minutes. 
  5. Prepare your steamer. If you don't have a steamer, use a big pot that can fit the two molds, or use two pots. Fill the pots with 3-4 inch-deep water, and put a metal stand at the bottom where you can place your molds on top it so the molds don't touch the water. Bring water to a boil.
  6. Strain the flan into the molds and cover with aluminium foil. Make sure to cover properly so water doesn't get in. 
  7. Place molds into the pots and steam for 40-45 minutes.
  8. Let cool and refrigerate.
  9. Run a knife around the mold, put a serving plate/dish on top, and turn upside-down to get the flan out of the mold. 
Enjoy!

Monday, December 22, 2014

Simple Chinese Roast Pork Belly Recipe

Homemade Roast Pork Belly Chinese Style
Homemade Roast Pork Belly

Ingredients:

  • 600 grams pork belly
  • 2-3 tbsps. Five Spice Powder
  • rock salt (enough to cover the top part of the meat entirely)
  • 2 tbsps. rice wine
  • salt
  • pepper

Pork Belly with Five Spice Powder
Steps:
    Pork Belly with Rock Salt CoverRoast Pork Belly
  1. Rub rice wine on the meat part of the belly. Follow it with salt, pepper, and the Five Spice powder. 
  2. Careful not to have any of the powder on the skin part. 
  3. Let the meat sit in the refrigerator skin-side up for at least 4 hours uncovered. 
  4. Preheat oven to 200°C (set to "bake"; top and bottom function)
  5. Take meat out and poke a lot of tiny holes on the skin without getting through to the fat layer. Make sure you've gotten rid of the hairs on the skin. If you find it difficult to poke the skin while raw, you may wait until step 9 to do this.
  6. Wrap the meat snugly in aluminium foil (skin-side up) leaving the top uncovered. Try to make the foil tray-shaped to avoid the fat spilling out. Leave about half an inch allowance on the height of the foil to accommodate salt.
  7. Cover the skin entirely with rock salt. 
  8. Put in oven, and bake for 40-45 minutes.
  9. Take meat out of the oven and completely get rid of the rock salt.  If you haven't pricked the skin yet, this is the time to do it. 
  10. Set meat on a wire rack and place foil underneath to catch the drippings.
  11. Put it back into the oven, and "Broil" for 10-15 minutes or until the skin is crackling and crispy.


Thursday, October 2, 2014

Super Easy Grilled Cheese Sandwich

Was too lazy to cook dinner last night so I decided to make some grilled cheese sandwich. It was my first time to actually make it and I love that it only took less than 10 minutes to prepare.

The photo below shows how it turned out. It looks weird because I cut out the edges (I really don't like eating the edges).

Easy Grilled Cheese Sandwich

Ingredients:

2 slices of bread
2 tbsps butter
1 slice of cheese*

1. Pre-heat skillet over medium heat. 
2. Generously butter one side of a slice of bread. 
3. Put the slice of bread butter-side-down on the skillet.
4. Add the cheese.
5. Butter one side of the other slice, and place butter-side-up on top of the sandwich.
6. Grill until desired brownness and flip over to toast the other side. 

*You may use whichever type of cheese you prefer. Since I like it cheesier than usual, I decided to use a slice of Edam, plus a couple tablespoons of grated Emmentaler. 

You may also add other stuff in it if you wish. I added a slice of ham and used brown bread instead of toast. 
Grilled Cheese with Ham
Grilled Cheese with Ham using brown bread


Wednesday, June 27, 2012

Project: Domesticated Goddess

***Simple Schnitzel Recipe below***

I think it's safe to say that ever since I moved to Germany, I have been more independent, less lazy and, much as I dislike admitting it, a lot more domesticated.

Where I came from, it is pretty inexpensive to go to a restaurant for meals if one feels too lazy to cook at home. I have friends back home whose diets consist mostly of McDonald's, KFC or some other restaurant. Here of course, we don't have the luxury of eating out often since it is darn costly.

In the four months that I've been here, I think I've cooked more than I have had in all the years that I lived in Asia. One gets pretty much used to it though after a while.

I make it a point to cook an Asian dish at least once every two weeks. The problem is,  Asian ingredients aren't really that cheap here. In my first month, I had a craving for the Filipino dish sinigang wherein one main ingredient is kangkong (water spinach). I went to the Asian store only to find out that they have it for 2,50 euros per 200 grams. Ack! Pretty steep but then I had little choice so I ended up buying it. Instead of throwing the stalks away as what we'd normally do in Asia, I searched in Google and found out that you can actually grow kangkong by planting the stalks.

Photo of Kangkong Plant
Soon my kangkong plant will be ready for cooking!

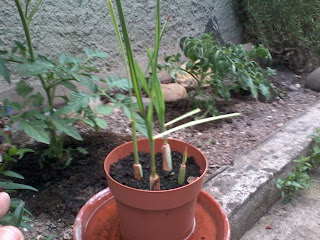
I'm also fond of Thai cuisine since it's pretty easy to cook and yet really delicious. In most of the dishes I like, lemongrass is needed. As with what I did with the kangkong, instead of throwing away the stalks I cut off from the lemongrass, I decided to stick them in a bottle with a bit of water. After a few days, I noticed that the top part which I cut off started growing back and after a week, roots started to come out and leaves started growing.


How to Replant Lemongrass
Lemongrass stalks which I put in water.

Lemongrass Transplanting
Stalks transplanted in a pot.

Of course, I also had to learn some German recipes. One of my favorites is pork schnitzel since it is very easy to make. If paired with potato salad, it becomes an awesome hangover meal.


Homemade Pork Schnitzel
Homemade Pork Schnitzel and Potato Salad

My Simple Schnitzel Recipe:
schnitzel-cut meat from butcher
breading (old bread that's lying around the house which I run though the processor)
flour
egg
oil for frying
salt and pepper

Get tenderizer and pound on meat so it's not as thick. Season with salt and pepper on both sides. Dip first in flour and shake off excess. Then on to the egg to coat it. Finally, dip it into the breading. Fry. Enjoy.

Come to think of it,  I don't mind the actual cooking so much.  It's actually planning the meals we'll have every day that bugs me. I have a newfound respect for housewives. It definitely is not easy.

Friday, September 10, 2010

Simple Beef Taco Recipe

"Stop, Taco time! Dun dun dun dun..." (to the tune of MC Hammer's "Can't Touch This")


Photo of Homemade Beef Taco
My homemade taco! 
I've been craving tacos for the longest time. Instead of paying $2 for one small taco at Pancake House, I decided to make some at home. The online recipes I found were not simple enough so I came up with my version.
This recipe takes less than 15 minutes to prepare. 


Ingredients:
1/2 kilo ground beef 
2 tsps. oil
1 pack McCormick's taco seasoning (follow instructions on pack)
1 medium onion, chopped
2 medium tomatoes, chopped
1 small head of lettuce, shredded 
shredded/grated cheese (depends how much you want)
salt and pepper to taste
1 pack taco shells


Heat oil in medium-sized sauce pan. Add the ground beef and simmer for 5 minutes. Add the taco seasoning, salt and pepper. Simmer for another 5-7 minutes and make sure the beef is completely combined with the seasoning. Drain to get rid of any excess water. 


Scoop meat mixture into taco shell and top with lettuce, onions, tomatoes and cheese. Really easy, right?


If you decide to follow this recipe, let me know if you like it. Or, if you have a better taco recipe that I can try myself,  feel free to send me the link. 

Monday, September 6, 2010

Homemade Mashed Potatoes Recipe

Homemade Mashed PotatoOnce you've tasted homemade mashed potatoes, you'd never want to eat those instant ones you buy at the supermarket. I know that some of you don't want to be bothered with all the prep, however, this recipe is really really simple.


Choose your potatoes wisely. A few tips:
  • make sure the potatoes you buy are solid and firm
  • it's better if you select from the potato bin rather than buy those that are pre-packed
  • avoid potatoes with bruises, cracks or wrinkles

Recipe below is good for 2 servings.

Ingredients:
4 medium-sized potatoes
2 tbsps butter (approx. 3-4 small cubes)
1/2 cup milk
salt
pepper
a dash/pinch of nutmeg

Boil water in a pot enough to cover potatoes. Peel potatoes and cut them in half (quarters for big ones) so they cook faster. Throw them in boiling water and cook for 20 minutes or until tender. How do you know they're done? Stick a fork or a small knife into a potato--if it's soft, then it's done. Drain and put in a bowl.

Add butter while it's hot and roughly mash the potatoes. You may use a wire masher or even a fork like I do. Add milk, salt, pepper and nutmeg. Mash some more until your desired smoothness. Don't forget to taste so you can adjust the amount of salt and pepper.

Homemade Mashed Potato plated with Salad and ChickenThe nice thing with mashed potatoes is that it goes with just about anything. For a simple dinner, you can eat it with fried chicken and lettuce drizzled with olive oil and balsamico.

Friday, September 3, 2010

Insalata Caprese

Photo of my Insalata Caprese

I am seriously craving for this antipasto. It is a really simple salad made of freshly sliced buffalo mozzarella, basil, tomatoes and seasoned with olive oil, balsamic vinegar, salt and pepper. We'd usually make this at home as we could buy large fresh tomatoes and the mozzarella from S&R. Unfortunately, a few months ago, the distributor stopped supplying S&R with said cheese. Now, the only other place I know of that we could get it from is Santi's which, as we all know, is not that cheap.

As this is a ridiculously simple recipe, it's important that fresh, top-quality ingredients are used.

Thursday, September 2, 2010

Easy Pork Sinigang Recipe

Here's my version of pork sinigang. I like it sour and with a lot of veggies. Since I haven't cooked this in a long time, I kinda forgot what some of the ingredients were as I was in the supermarket. Good thing the lady weighing the veggies was there to help me out.


My version of Pork Sinigang


Ingredients:

1/2 kilo pork, cut into chunk cubes
1 medium onion, sliced
2 medium tomatoes, sliced
2 eggplants, sliced
1 bunch of kangkong (I usually cut off the thick stalks)
1 bunch of string beans, cut into 2" long
1 small radish, cut into thin round slices
1 liter of water
1 packet of sinigang mix (I used almost 2 packets since I like it sour)
2 tbsps patis (fish sauce)


In a pot, add water, pork, onions and tomatoes and bring to a boil. Lower heat and simmer for 15 minutes or until meat is tender. Add sinigang mix, fish sauce, string beans, radish and eggplant and simmer for another 10 minutes. Throw in the kangkong and simmer for another 2 minutes.

Monday, August 23, 2010

Simple Spaghetti Bolognese


My version of Spaghetti Bolognese
Here's a quick and easy recipe that everyone can follow. It's so simple that you really can't mess it up even if you don't know how to cook.

The Bolognese sauce while being cooked
Ingredients:

Sauce:
1/4 kilo ground beef
1 medium onion, chopped
4 cloves garlic, chopped
3-4 cups tomato sauce (I used Del Monte Original)
2 tbsps oil
salt
pepper

Pasta:
150g spaghetti
oil
salt

Heat oil in non-stick pan over medium heat. Saute garlic and onions. Throw in the beef and separate clumps. Cook for another 3 minutes and pour in tomato sauce. Season with salt and pepper and keep stirring until it is gently bubbling. Switch to low heat and simmer for 20 minutes. Taste sauce and adjust seasoning.

While the sauce is cooking, boil water in another pot and make sure it's enough to cover the pasta. Add about a teaspoon of salt and oil. Once boiling, add the pasta and simmer for 10 minutes or according to package instructions, until al dente (firm to the bite). Drain and put on a bowl or plate.

Scoop sauce onto pasta and top with grated parmesan.

Buon appetito!


Tuesday, August 17, 2010

Simple Pork Adobo Recipe

Adobo is a Filipino national dish that is very simple to make. There are several ways Filipinos cook their adobo. There's the dry adobo, the wet (saucy) one that's heavy on the soy sauce and the brown saucy one which I'd like to call the carinderia-type adobo.

I have been craving for adobo for weeks now and unfortunately, I couldn't find the carinderia-type in the restaurants close to where I live. So, to satisfy my craving, I decided to experiment.

Below is the recipe for the one I made:

Homemade Pork Adobo

400 grams pork
1 cup water
3/4 cup vinegar
3 tbsps soy sauce
4 cloves garlic, peeled and crushed
4 bay leaves
1/2 tsp black peppercorns
salt

Add all ingredients except meat into a pot. Bring to a boil. Add meat, cover and simmer until meat is cooked and tender.

It's as easy as that! This recipe is good for 2-3 people and is best served with rice.

Let me know what you think!